Download the CCDOPS application to your PC (must be a Windows PC) and the driverChecker
my own YouTube: How to Use CCDOPS ,
someone else's: a YouTube tutorial on using Registax 5
Using PhotoShop for Astro 8A
The following is a step-by-step guide to how you're going to take your raw image files and produce a finished, beautiful image of your spectacular astronomical wonder.
The Goals: You have not one but TWO separate tasks to accomplish for your 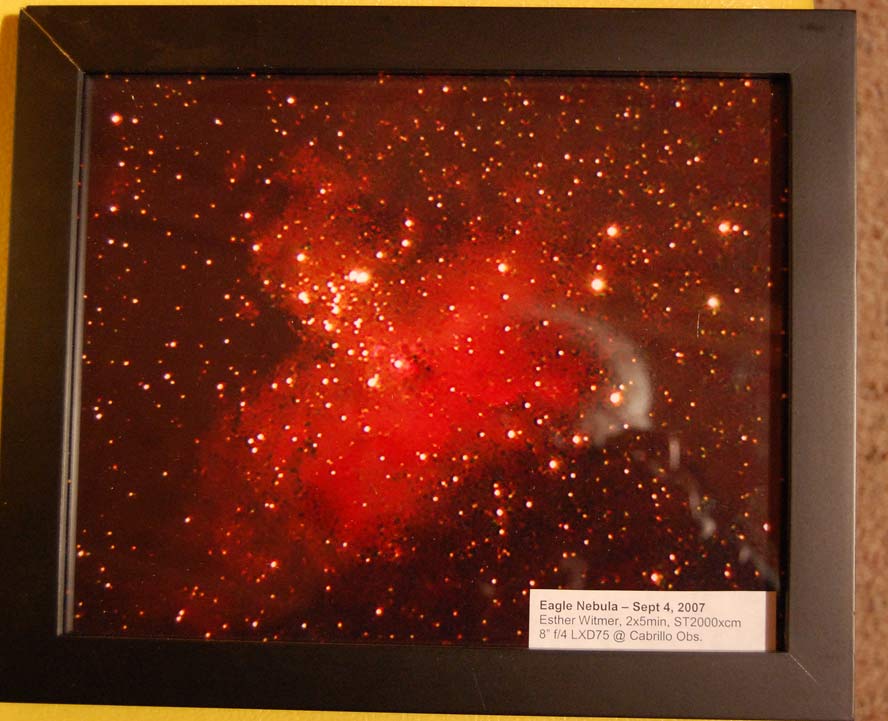 grading. You produce a framed print, and also jpg versions for our online Student Gallery...
(1) An 8x10 inch print on good quality glossy or matte photo paper, framed, with 2 typed labels: a typed label of basic info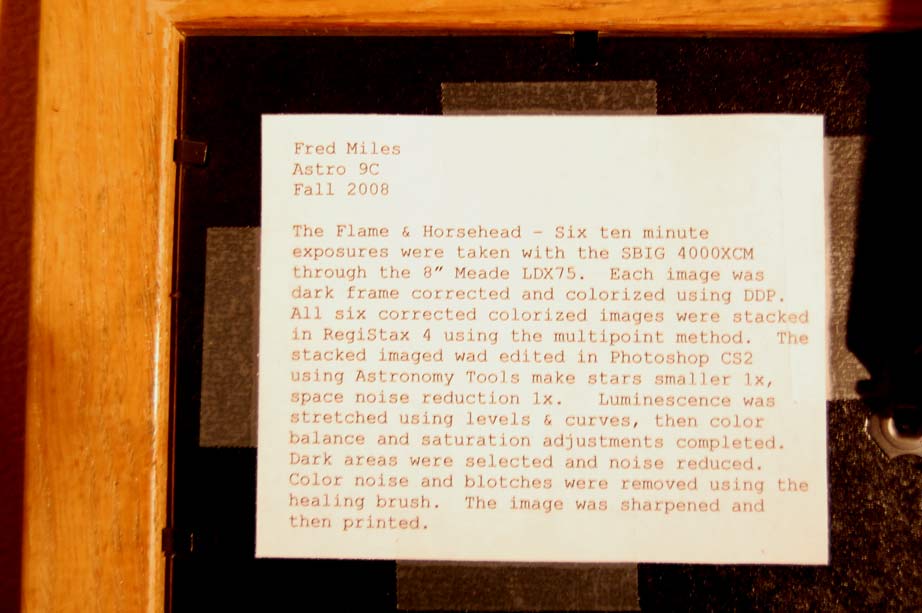 rmation on the front, and a larger typed label on the back describing your object, date, etc. and especially all your image processing steps (see an examples at left and right), and
(2) You'll email to me jpg versions of your final images, properly sized, and include the information in both of your labels as a plain text file - NOT as a MS Word or WordPad file!! Let me repeat.... NOT as a Word or WordPad file (these include formatting which is a real pain for me to remove as I must before I can put it on our online gallery!) For Astro 9, you'll submit two framed 8x10's of your best images, and you'll email me all 5 (1 if Astro8A) of your images as jpg's and all the label information same as for Astro 8A. See this page for details on the right and wrong way to size your images and make your labels. Due Date: You must email to me the .jpg images for the on-line gallery as an email attachment, and another attachment for the .txt text file to contain the caption with all your steps - due no later than the FRIDAY before FINALS. Turn-ins that are late earn a penalty. Now I'll describe the details on how to do this....
If you are working on the room 705 computers and Rick hasn't
turned on the computers yet, tell Rick to start up the computer under Rick's own account . Do
NOT use your own personal login and password because you will then not have access to all the
file structures and software Rick's installed on these machines.
(We have WiFi internet available in both 705 and at the observatory, if you'll be working on your own laptop. To access the internet through Hawknet, first log in. If you haven't yet logged in this semester, Here's how to get your personal password.
but again, use your pesonal password only on your own laptop)
Installing CCDOPS5 and Registax On Your Own Computer (skip this if you'll do all your work on room 705 computers, but I urge you to plan to use your own computer if possible)
First, determine if your Windows machine is 32bit or 64bit by following the easy steps here. You can Download the .exe file which installs CCDOPS here. Download and install DriverChecker64 (true regardless if your computer is 32bit or 64bit). After both are installed, run DriverChecker64 and it'll make sure you have the latest drivers, and then click Update.
Then go to the Registax download page and install Registax 5 (preferred) or (if you can't download 5, do Registax 6). Here's a YouTube tutorial on using Registax 5
Next, click on and then print this page to log your processing steps. (note we have a printer above the middle computer in room 705). You'll need a record of these so you can type up your labels, which are an ESSENTIAL and important aspect of my grading.
Using CCDOPS for Initial Processing
First - just read this opening paragraph before doing anything... The images are stored in a
proprietary file format designed by the Santa Barbara Instrument Group – the company
that makes the camera. These file names will terminate with a “.st2k”
or ".st4k" file type designation, for the ST2000 or ST4000 cameras we use. For Astro 8A, we use only the ST2000 camera, mounted on the big scope under the dome. You
must use CCDOPS in order to work with these proprietary formatted image files
during the first stage. No other image software understands these file formats. Again, ff you used the indoor dome telescope, that is an ST2000xcm and will have a “.st2k” file type.
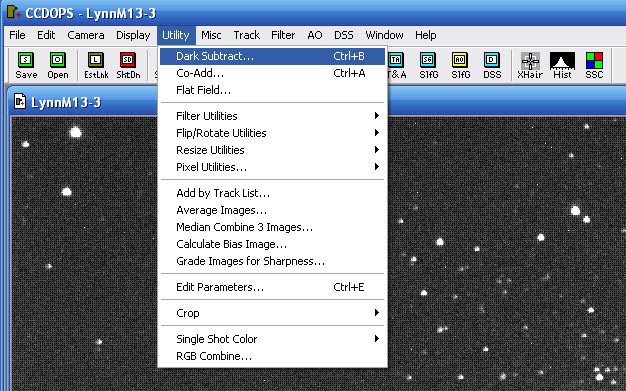
![]() Now click on this camera icon for CCDOPS on the computer desktop to start up the program. (note, do NOT simply start your session by clicking on your image! It will cause software incompatibility issues that'll freeze CCDOPS.). Rick will have transferred your raw images to the lab room computers in this folder: c:\astropix\a8spr14 for astro 8 in Spring '14, or similar name for Astro 9. Work on and save ALL your processing within this folder! The only thing you should ever put on the computer's desktop is something you're going to immediately copy to your flashdrive and then delete from the desktop. Any images on the desktop are assumed to be temp files and you risk having them moved to the "recycle bin" by me or the other instructors who use this lab room. I need to keep these computers clean and know where your images are, so don't go creating your own folders. Don't stick things on the computer's desktop! Geology, Oceanography, ES, and other students use these same computers - they are not Astronomy's computers.
Now click on this camera icon for CCDOPS on the computer desktop to start up the program. (note, do NOT simply start your session by clicking on your image! It will cause software incompatibility issues that'll freeze CCDOPS.). Rick will have transferred your raw images to the lab room computers in this folder: c:\astropix\a8spr14 for astro 8 in Spring '14, or similar name for Astro 9. Work on and save ALL your processing within this folder! The only thing you should ever put on the computer's desktop is something you're going to immediately copy to your flashdrive and then delete from the desktop. Any images on the desktop are assumed to be temp files and you risk having them moved to the "recycle bin" by me or the other instructors who use this lab room. I need to keep these computers clean and know where your images are, so don't go creating your own folders. Don't stick things on the computer's desktop! Geology, Oceanography, ES, and other students use these same computers - they are not Astronomy's computers.
Your mission in CCDOPS is to do dark subtraction, flat fielding, and color conversion. You do all steps for one image, then save it. Then start on the next image. Do this until all your images in your 3-image set are done. First, you do not just click on your image and expect it to open the right software. That will create bizarre errors. You ALWAYS open your image from within CCDOPS. So let's start...
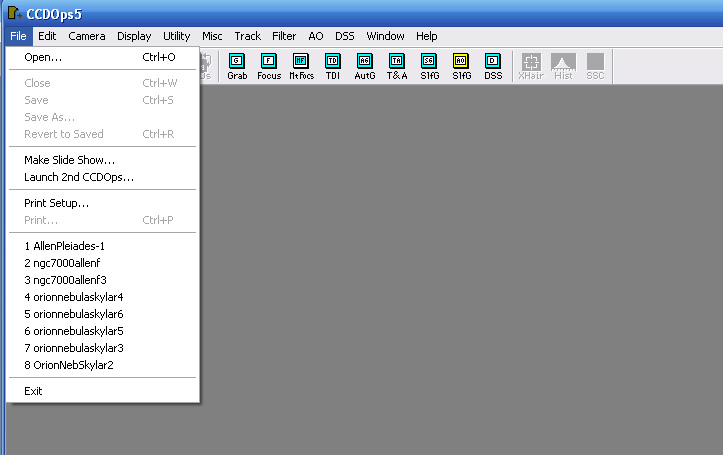
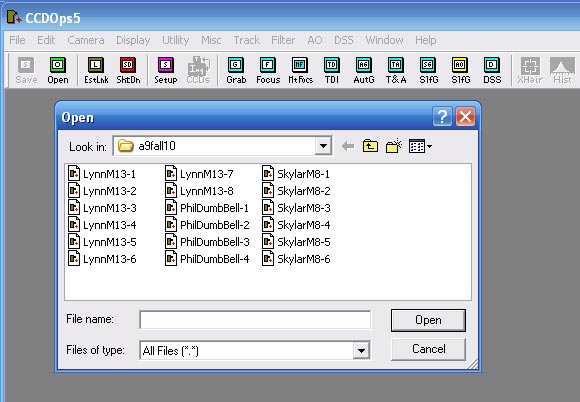
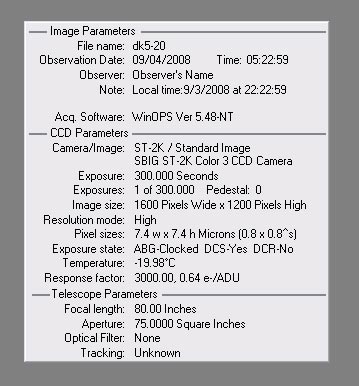
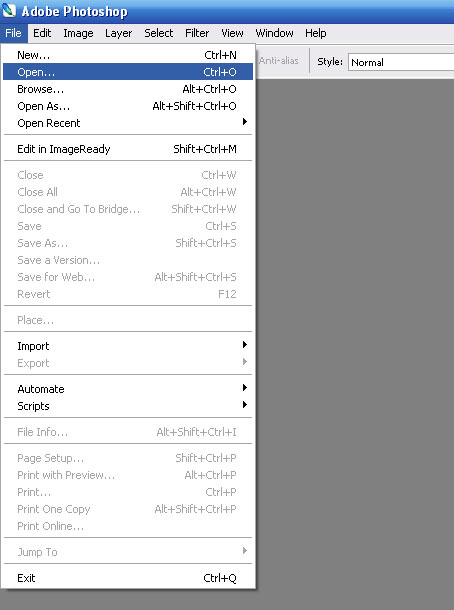
Click File | Open and navigate to the folder with your first image, like shown here. (The little yellow folder with the crooked arrow takes you up one level, if needed). Your image will have the little CCDOPS icon left of it. Click on your image and then open. You'll see a small box of information about your image appear. Use the page you just printed out to write down the local date, time, (not the UT date, time) how long the exposure was (300 sec is 5 minutes, etc.). The chip temperature is the most important item, but it is not recorded in this box, alas. That's why I emphasized when we were shooting your image at the telescope, to write down the temperature in your Observing Labbook. Remember that CCDOPS records the chip temperature to a precision of a hundredth of a degree, but the thermostat can only control the temperature to about half a degree, so round off the chip temperature to the nearest degree. For example -19.94C would be recorded as -20C. The domed indoor scope is the 12" Meade. If your picture is with the dome scope, it's the 12" f/6.3. Then hit the enter key and your image should appear onscreen.
Here's a general tip for all of you when applying corrections and processing steps to your photos... position your mouse cursor on the right place, and before applying the correction, take a good hard look at your photo and be watching it while you click. Then you'll see clearly exactly what the step does. If your images doesn't change in the way you expected, and especially if your image looks worse, then stop and make sure you did the right thing. Note though that when you apply your dark frame (below), the picture will suddenly look too dark. No worries - just click the "auto" box and apply and it'll look normal, and it should look less noisey as well.
The processing steps below MUST be done in the order I give below. If you do not, you'll ruin your image. And don't ever dark subtract more than once, or flat-field more than once. Again, if you do, you'll ruin your image by over-correcting it. Note on the top menu bar there is edit and then undo, to go backwards if you accidentally goof.
Another caution is if your image has saturated over-bright parts and faint parts, you may have to adjust the "contrast" and "background" boxes while in CCDOPS. Ask me when you're working on it in 705.
Dark Frame Correction
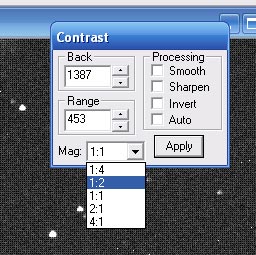
A little contrast
box will appear, and at the bottom click
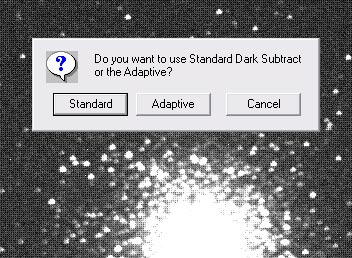
in the Mag box, select 1:2, like shown here. Now your image should shrink to fit inside the screen properly. Your first task is to perform your dark subtraction. I label our dark frames in a logical way: A 5 minute dark frame at a chip temperature of -30 degrees Celsius using the ST4000xcm camera would be labelled dk5-30.st4k. If it were with the ST2000xcm camera under the dome, it would be dk5-30.st2k. Click Utility | Dark Subtract and a box will appear. Navigate to the proper dark frame. It'll probably be one level above where your image is (the reason is - dark frames can be applied to any image for any class or semester, so it would not be efficient to store them just in your particular class folder). When you find your dark frame, click open and a little box will appear asking you whether to do it standard or adaptive method. For the way we do things, it won't matter which you choose, but choose standard . Your image is now dark-subtracted. You'll probably notice it looks way too dark. But don't worry, that's just the way it's rendered onscreen, the actual image is just fine. Now click in the contrast box and put a check in the auto box and apply. Your image should now look normal. Now that your image is dark subtracted, it's vital to understand - NEVER save the dark-subtracted and/or flat-fielded .st4k image! The reason is, if you 'save' it, you'll overwrite the raw image because the name hasn't been changed, and your raw image will be gone. The dark-subtracted image is only an intermediate step and there's no reason to save it anyway. So, onward...
Flat Field Correction
You need to flat field your image, to correct for uneven illumination and for any dust on the CCD window. So for example - you'll notice your image has darker corners. To correct that, you need to divide by the flat field image. There is a single flat field image appropriate for all images no matter at what temperature. If you're not sure what the name of the proper flat field is, ask Rick. Click Utility | Flat Field and select (open) the flat field image. It may be labelled with the name "flat" something, or if you're unsure, again, ask Rick. When you apply the flat field correction (i.e. 'open' it), you should see your corners become normal. If not, stop! - and ask Rick what's the deal. At every point, in fact, you should have an idea what your step will do to the image and how it will improve it. If it does not, then do NOT go on, but back up and try again or a different step or ask Rick or Becky how to proceed.
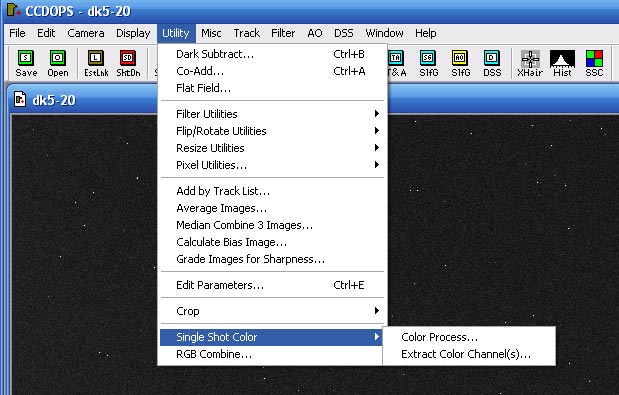
Converting to Color
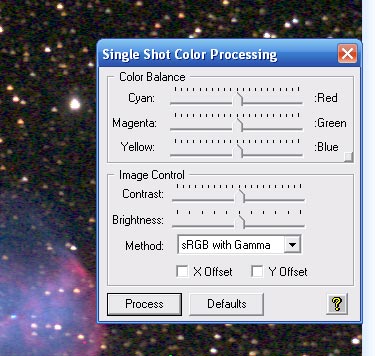
To convert to color, click Utility | Single Shot Color | Process and that will bring up the single shot color box. Make sure the sliders are all dead center. The Xoffset and Yoffset boxes may, or may not, have a check mark in either of them. Just leave it as is, whatever you find. For Method, you'll almost always want to use sRGB+gamma. This method brings the faintest and brightest parts of the photo within the 16-bit range of the camera in the best way. For nebulae and galaxies I would be tempted to say this is ALWAYS the method to use. For globular clusters you can try DDP method, but that's the only use I've found for DDP. Important for you to know - your goal at this stage is to preserve as much image detail as possible. Any part that is saturated white or pitch black at this point will be unrecoverable later in Photoshop. Your goal right now is NOT to try and tune it to be the best-looking! No! Not yet; you do that in Photoshop. DON'T tell me your image looks "better" with a method other than sRGB+gamma unless you clear it first with Rick. Re-read the goal above!!
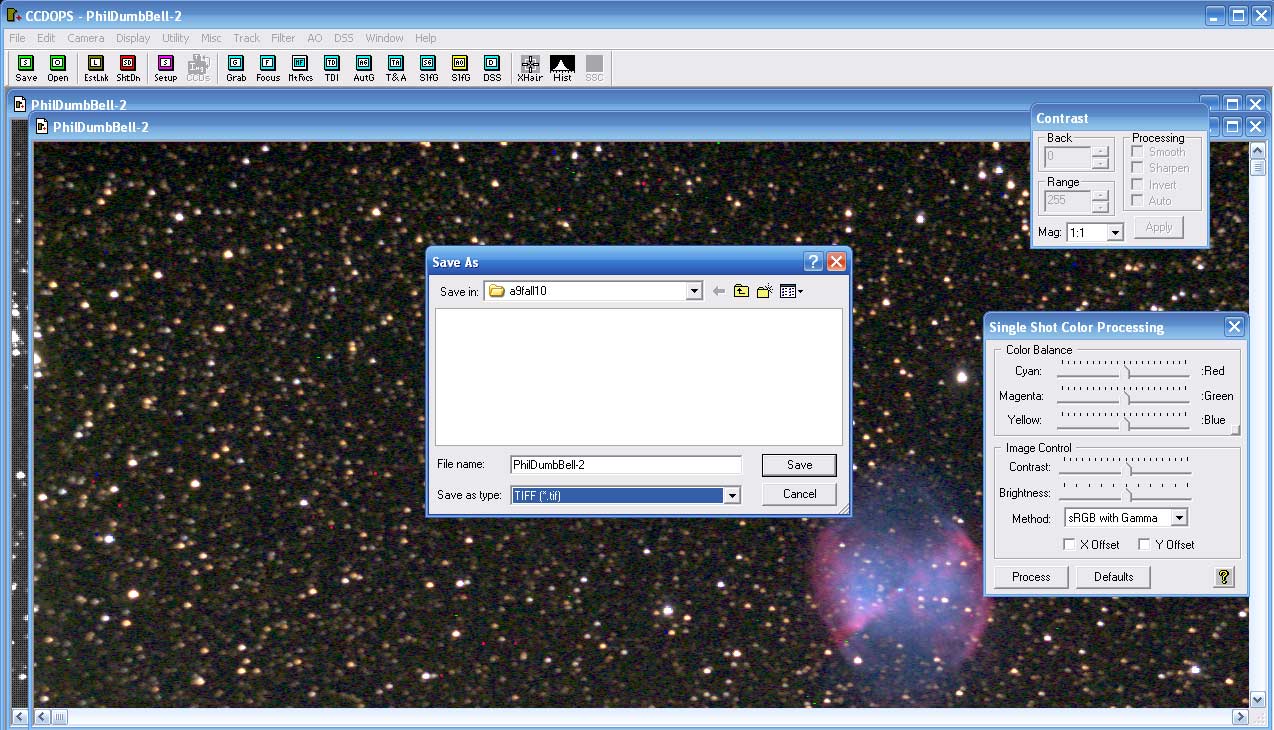
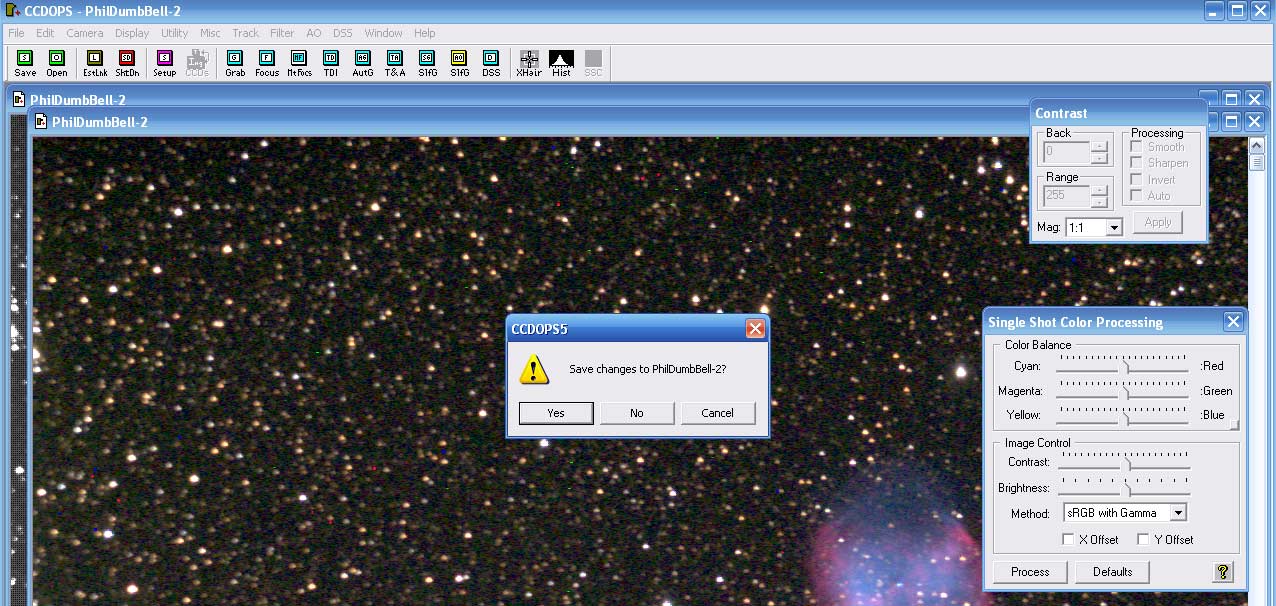
So, that means that once you see your image in color, and if the colors don't look totally wrong, it's time to save it. Click File | Save As and you should see the save box as shown here, and note that the file type it offers is TIFF. Keep the name that it offers - it'll be your original file name but now with a .tif file type. If you're on a room 705 computer, make sure it is saving the image to c:/astropix/a8spr14 or whatever is the right folder for your class. This next part is really important - click the little "X" in the upper right corner of the image boxes to close them out . Each time you do so, you'll be asked "save changes...?" and you answer "NO NO NO!!!!" Why? Because first, you already saved the .tif file, and most important, if you "save changes" on the black and white .st4k image, you'll be overwriting your original .st4k file and it'll be gone. Unless... you might be able to undo the damage with edit/undo. Or maybe not.
After saving the .tif file, you are finished with CCDOPS for your first image. Repeat these steps for your other images, then close CCDOPS.
Stacking Your Images
![]() Let the program fill your monitor screen by clicking the "maximize" box in the upper right, as shown here. (Registax 6 or later may look a little different)
Let the program fill your monitor screen by clicking the "maximize" box in the upper right, as shown here. (Registax 6 or later may look a little different)
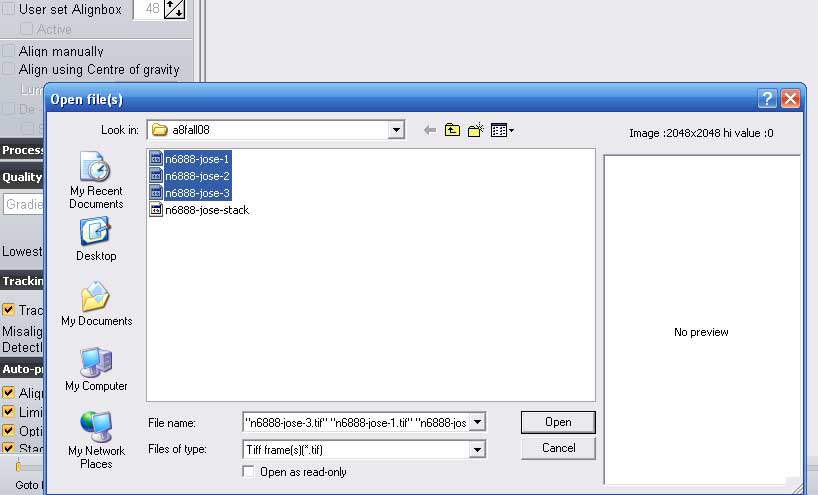
In the upper left, click on Select and browse to the right folder.
Now you need to open up all of your images at once, so here’s how you do it – click on your first image, then hold down the shift key and click on your next, and your next,
etc until you’ve clicked on all of them. They should all be highlighted.
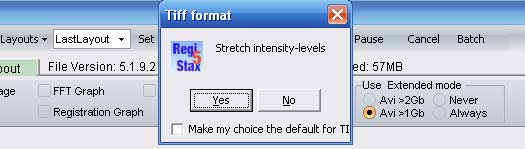
Now click Open, as shown here . You may now see a pop-up box
asking "stretch intensity levels?", answer yes.
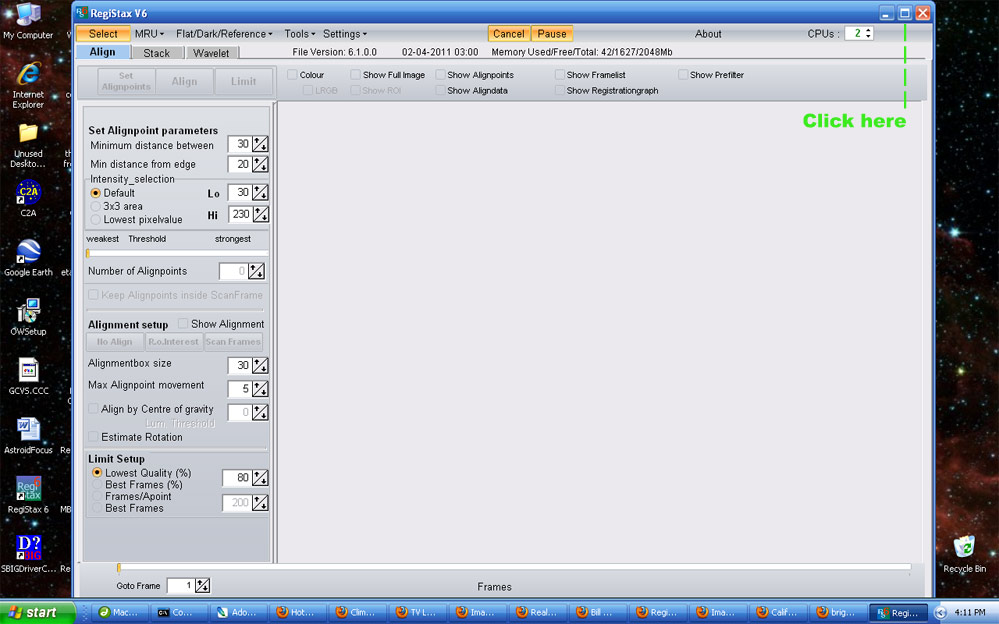
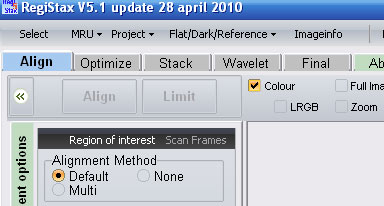
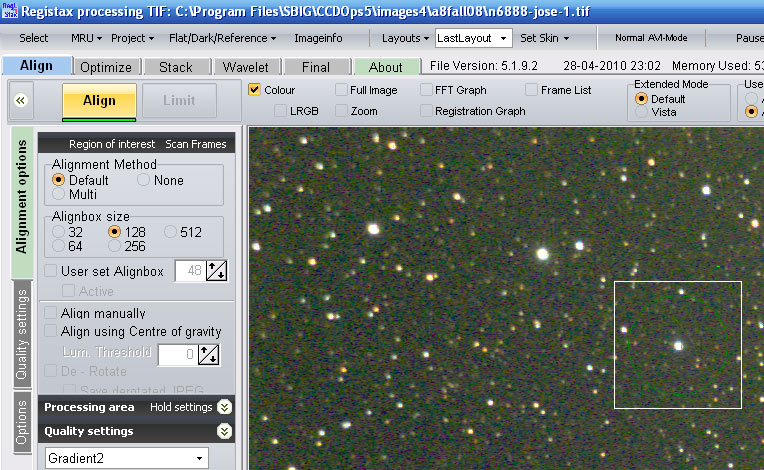
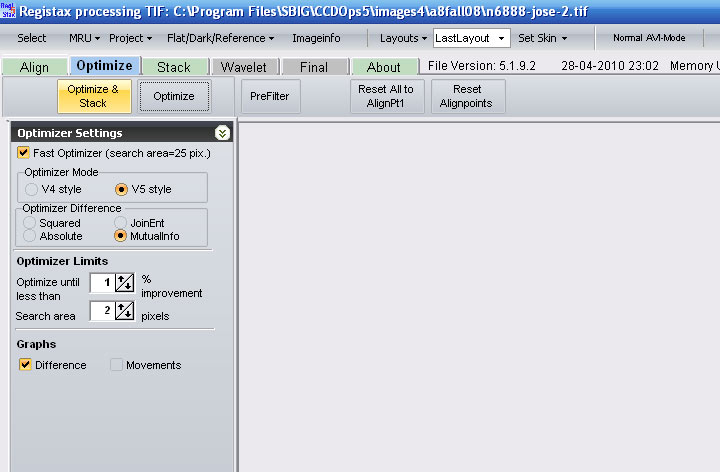
Now set the stacking parameters. Look at this image of the screen and set your parameters as I have...
Alignment Method: Default
Alignbox size: 128 (this might have to be adjusted if your stacking keeps failing)
Lowest Quality: 0 (this insures Registax will keep all your images in the single, final, stacked image)
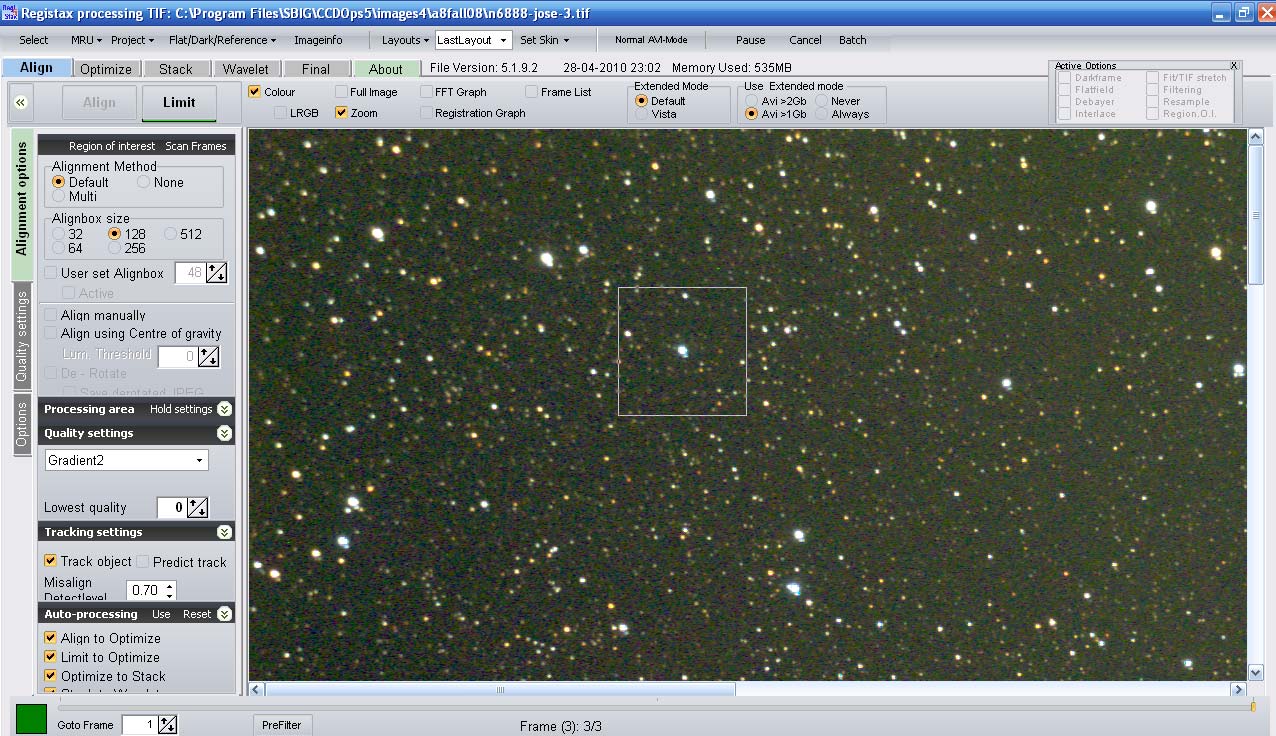
You should
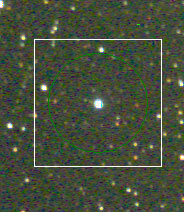
see a cross inside the alignbox on your image, moveable with the mouse, and you'll see the blue Align tab highlighted. It’s asking you to select
a star to use as an alignment anchor. Here's what it will try and do - it'll search over a region the size of the alignment box from image to image and find the chosen star. If your images move only a little from one image to the next, you can have a small alignbox size. If there's bigger movement, you'll need a bigger box. It will stack all images without rotation,
trying to identify that same star on each photo. To successfully stack, your
star needs to be fairly easy to identify. That means, it should be clearly
the brightest in its local area, and it should be in an uncrowded area, if possible. Try not to pick something close to the edge, but hopefully
closer to the center. If you’re imaging a star cluster, finding an uncrowded area near the center may not be possible, but being uncrowded is more important than being at the center. Click on your chosen alignment star,
and it should grind for a second or two and then pop up a box with an expanded
view of your star and some other stuff.
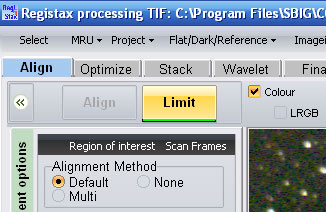
When the align box disappears, the Limit button will be highlighted. Look at the bottom of the Registax screen and you should see your stack size (how many of your images are in the stack it is making). In my example, note it says "stacksize 3/3" which means it kept all 3 of the 3 images I opened. That's what you want - to keep 'em all! If for any reason your stacksize isn't the full number you opened, you have to go back and click Align and be careful to set the Lowest quality to 0 again and try again.
Now click the Limit button and it should try to reject any images that are
not good enough. Since you set the lowest quality to 0, that should force it to keep all of your images. At the bottom left of the screen it'll say how many of your
frames are in the final stack. Make sure it's all of them. Cross your fingers
and toes and click the Optimize & Stack button at upper left.
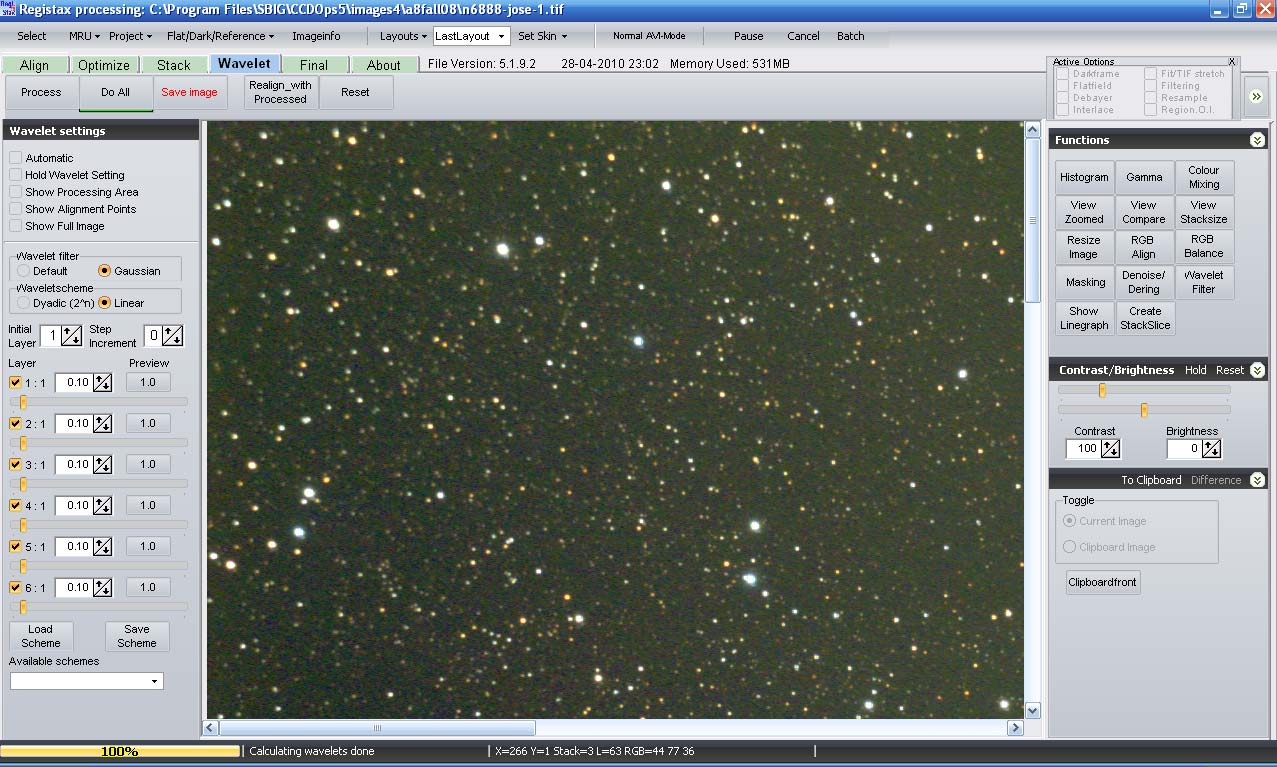
This will actually stack your images together. It'll take several seconds or longer. When its done, it'll show your stacked image and a bunch of controls for 'wavelet
processing' on the left side, like this. Does your stacked image look good? Notice in my example that the stars look nice and tight, and the sky looks smoother. Did yours stack successfully?
You can tell if it failed because it’ll be as if you're seeing with “double
vision” ( or triple, quadruple…).
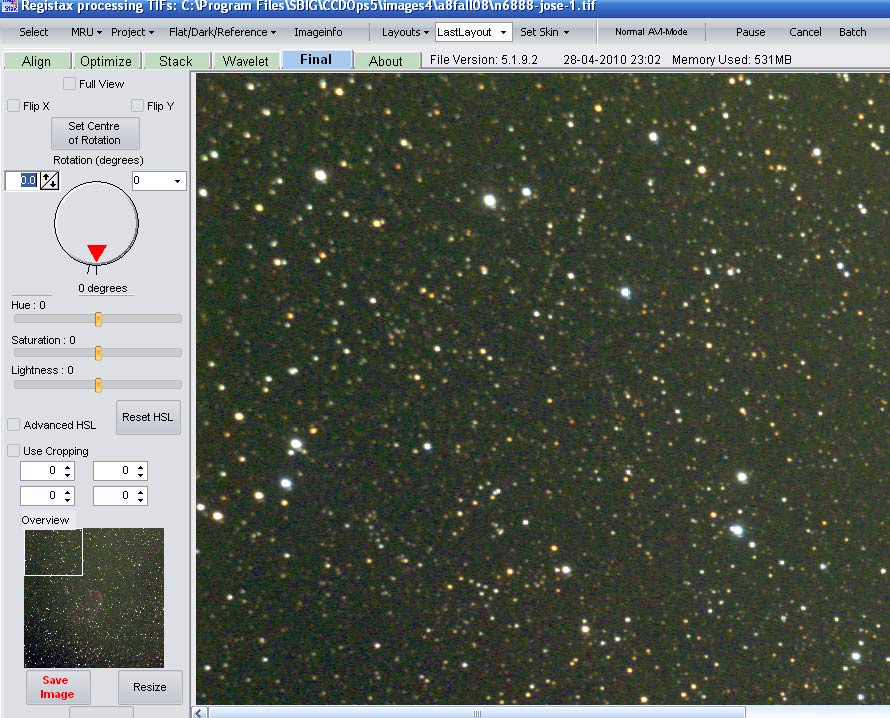
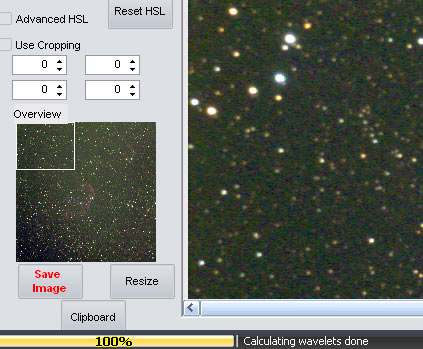
If the stacking succeeded… Click Final on the upper toolbar and your screen should then look like this. Then click on the red Save Image at the bottom left of the screen, like shown here. A box will pop up and ask for a filename and file type. You want to choose TIFF(16bit *RGB). This will preserve the maximum bit depth.You must name your image just like your input image names, with the "-1", "-2" etc replaced by “stack” at the end of the name. In other words, it must have the same name as your individual images, but with "stack" instead of "-1" or "-2" etc. For example, if you are James and photographed M35, call it JamesM35-stack.st2k. This is vital because if the rest of the name isn't identical (JamesM35), we will not be sure that stack is the stack of those particular images.
If the stacking failed… go back to the select button and start over. Try enlarging your alignbox size (see in the toolbar area. 32, 64, 128,
256, 512 are your choices. If your images are really offset from each other,
this might be necessary. 128 is a good starting assumption. The other main thing to try is using a different
star. Keep trying until it works! Notice that there are functions for changing
the brightness and contrast and color, but don’t use them. Keep the colors
and contrast bars right in their default position - the center. Remember,
you'll be doing your image processing in Photoshop, your goal now is just
to preserve the maximum range and detail so Photoshop has good raw material
to work with. Close the Registax program.
On to Photoshop and Creating Your Masterpiece
Loaner PC's from Cabrillo should have Photoshop pre-loaded for you. If you are using your own personal PC and don't have Photoshop, there's Gimp as a free alternative, although it will be a longer term project for me to convert my project instructions to Gimp. I've not learned it myself. It's a whole new planet, is what I hear. For now, I will assume you have Photoshop or already have another image processing software which we can help you with fixing up your photo.
You can do almost ANYTHING in Photoshop. I still know only a small fraction of its possibilities. We'll start you on your path and then you can explore and experiment ad infinitum. Let's just make sure you've got the basics that will be most important for tuning your picture. You can read an alternate version of my Photoshop basics instruction page here.
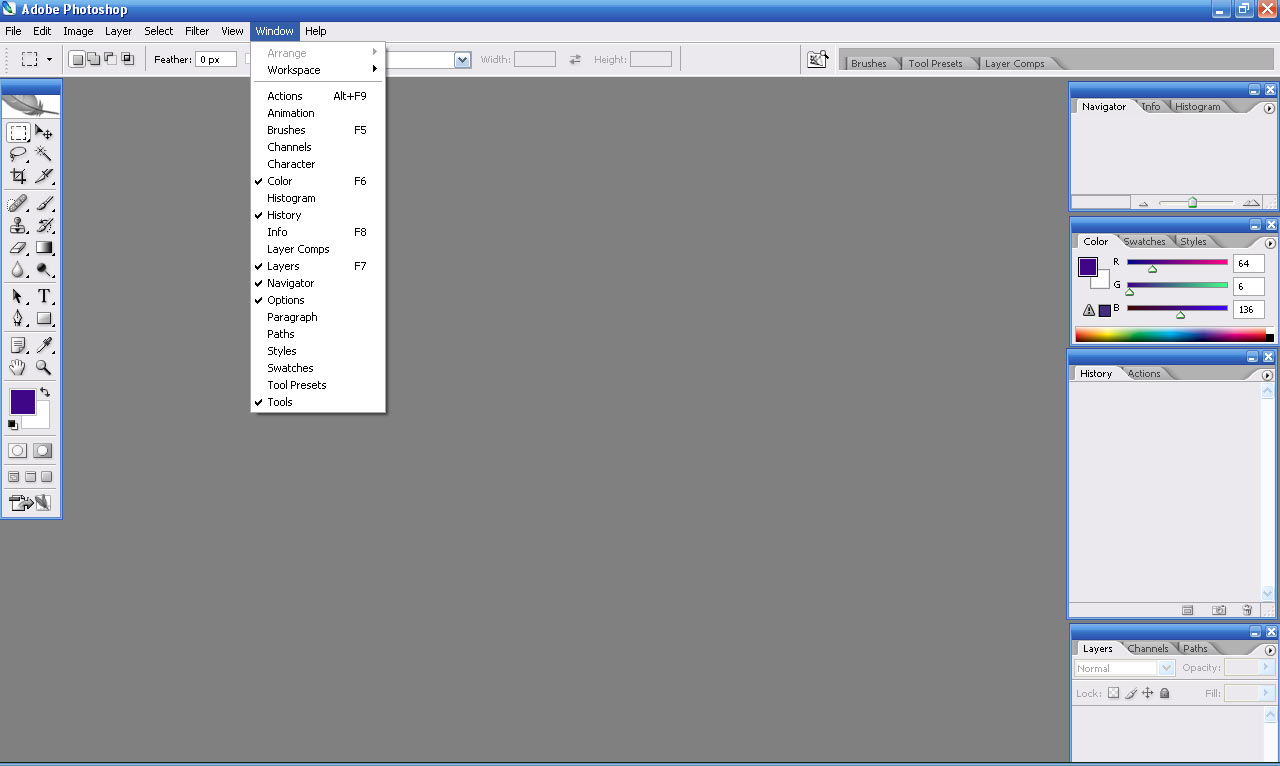
First, set your windows and options and drag them to the sides of the frame so you'll have a good workspace. Click on Window on the top toolbar and click the options as shown here. Now you're ready to start working on your image...
Your Guiding Principles
Photoshop is where the real work is done. You need to understand what the goals are. Astrophotography is hard; light pollution, dim objects, poor atmosphere stability, passing satellites or airplanes, dew on the front lens... all degrade the quality of your image. Your goal is to reduce these limitations. Try and make your photo look like it was taken in a darker site with less light pollution, with a bigger telescope that gathered more light and so produced less digital noise, and with sharper detail as if done in a steadier atmosphere, and with truer colors. But suppose you consider yourself an artiste, with a deep need to turn your image into a wild drug-dream version of itself. Resist the temptation! Or rather, save that urge for AFTER you've produced your version to be graded, according the above goals. This image is now your property, you can take it home and do whatever you want with it, but for grading, I'll be look at how well you followed the guiding principles described here.
* The ideal sky is NOT pitch black but instead is very very dark gray
A pitch black sky will hide the dimmest parts of your deep sky object, especially nebulae or comets - the dimmest parts are often the most photogenic and also give size to your subject.
*There Are No Green Stars
When you're adjusting colors, be aware that all stars are either white, or some shade of reddish or bluish.
* Most spiral galaxies have an orangish central bulge and bluer disk
Spirals have an older red-giant dominated central bulge, and a disk that is has spiral arms whose brightest stars are hot and blue. But this rule is not iron-clad so ask me for guidance.
*Objects photographed at low altitude will look redder than they actually are
Just like the setting sun gets redder, due to scattering out of the bluer light by particles in our atmosphere, so too does this happen with all objects. If your object is lower than 35-40 degrees altitude, this might be noticable. Hazy days and nights even more so. You might notice this by seeing that most of your stars are yellowish or orangish. Consider upping the blue in such photos.
Here's Some Additional Advice...
Never call me over to look at your image in Photoshop and then ask me "is that good enough?". Because I'll just reply - "what's your goal? What don't you like about it, or what do you think should be improved?" You tell me your goal and I'll show you how you can try and accomplish it. Ask me a specific question and you'll get a specific answer. Never never ask me or any teacher "Is this good enough?" That tells me you really don't care. ALWAYS a bad thing to communicate to a teacher who has dedicated himself to teaching you in a class you've chosen to take. OK, back to working on your image...
Click Image | Adjustments
And you'll see a long menu of possibilities, including Curves and Levels. These are used for adjusting the brightness of different parts of your image. Curves gives you the most flexibility, but Levels is best for setting the pure black and pure white levels. First, here's a great YouTube tutorial on using Curves and Levels.
You may be hesitant to play around - what if you wreck your hard-won photo? Not possible! Photoshop doesn't save anything until you tell it to. Even then, you can always save it with a different name and thus preserve your original. This is always a good idea. What if you dont like what you did? Easy! You can undo commands in general by clicking on the history box and right-click | delete on the command to delete (which will also delete all commands executed after it as well). If you just want to undo the very last thing you did, it's easier to just click on edit | undo in the top toolbar. However, when you save a picture, all the history goes away, and you can't go back and undo individual steps. I never save a photo I'm working on until I'm done with it. I try to finish working on it all in one sitting. At the very least, I try to be sure I will NOT want to delete any steps I've done before I save it.
Then in the far right windows you'll see one for History and you'll see a chronological list of your changes so far. Right-click on the first one you don't like and it'll let you Delete it (this will also delete all later changes). And you'll be back to where you were before you made that change.
In the same menu, also try adjusting your color. If you're
shooting a shot with an nebula, you can pump up the
colors with the Hue and Saturation command.
Another thing which you will almost certainly want to do is to compose your photo properly by cropping it. For wide angle shots which include a horizon on the Earth, a good rule of thumb is the "rule of thirds"; your photo may have a primary subject and a background. Your primary subject should take up roughly 2/3 of the photo and the background 1/3. Or if there's a horizon, the horizon should be 1/3 of the way from one edge. But creative types can violate this rule, so don't be obsessive about it. But it should have some kind of harmony and balance when you're done. If the good stuff is all on one side and a lot of emptiness is on the other, you'll want to crop it. Click Image | Crop and you can move the dotted rectangular borders enclosing your cropped image to suit you. If you crop out too much, your final photo will be magnified, but it will also look grainier and the stars will be bloated, so be careful. It's tempting to crop out everything but your primary subject and make it fill the frame, but it may not make a good final photo (unless you print as a 3x5 and hang it above your sofa so no one can get a close look at it!).
Sometimes a photo works better in portrait and sometimes in landscape, and sometimes your subject may look better if it's rotated. You can adjust this. Click Image | Rotate Canvas. If you rotate it by some arbitrary angle, you'll notice that some white triangles appear around your rotated picture. To get rid of them you'll have to crop them out.
One more thing which is often appropriate to do is to sharpen your photo. If the focus is a little soft, you can make your edges sharper. Click on the top toolbar Filter | Sharpen | Unsharp Mask and play with the parameters to see if you can improve your photo. Be careful, you can easily oversharpen and make it look phoney. You can try Filter | Noise | despeckle to reduce graininess. Or a more extreme version of this goal is to use Filter | Noise | Median and try different pixel numbers within that command.
Photoshop Actions
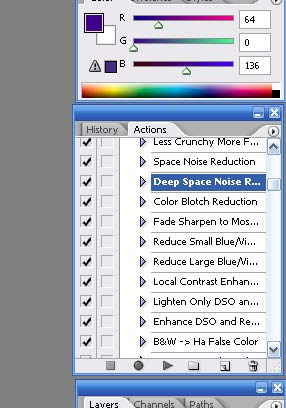
Neil Carboni's Astronomy Tools for Photoshop is a great set of Photoshop actions (like macro's, if you know what that term means) which are on our room 705 computers, or you can buy for cheap $21.95 and are well worth 5 times that if you do astro imaging. If you don't have these tools, contact me and we'll work something out, for your time in Astro 8A.
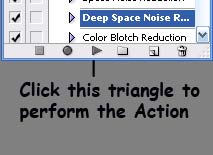
The most often used will be make stars smaller, and space noise reduction, and local contrast enhance, and most of these you can click more than once for added effect. You single-click on the action you want, then click the little black triangle at the bottom of the 'actions' box - then you'll see it work hard for a few seconds and voila'! Your action is accomplished! Now, you know that you can undo commands in general by clicking on the history box and right-click | delete on the command to delete (which will also delete all commands executed after it as well). When you want to undo an "Action", it's slightly different. All Actions, no matter what they are, put the same triplet of commands in the history list... paste, layer properties, merge down. To undo the Action, right-click and delete the entire triplet.
My Personal Favorite, Most Used Photoshop Commands
Under Image | Adjustments are levels and curves which should be used on virtually every image
Under Image | Adjustments | Hue & Saturation I often adjust the saturation to bring up the color. Never do I adjust Hue, which changes true colors to something else hard to predict
Under Image is rotate canvas which will rotate your image. Sometimes that improves the balance
Under Filter | Sharpen | Unsharp Mask will sharpen a fuzzy picture. However it can also make for annoying graininess, so take care and do go overboard. Your picture should never LOOK like you had to artificially focus it!
Image | crop is also used almost always, to place the subjects in a pleasingly balanced way and not let them get lost in a big boring sky. Don't zoom in too much or the imperfections will be more obvious
Photoshop Actios | Astronomy Tools Actions my most often used are... (use at most once or twice. Rarely can you get away with more than that.
space noise reduction is almost always worth doing once or twice
make stars smaller is a way to improve focus and reduce the dominance of stars when the real subject is a nebula or galaxy
local contrast enhance can bring out subtle contast in a flat-ish looking nebula or galaxy
Enhance DSO and Reduce Stars can help with faint nebulae
Going Crazy...
You are certainly permitted to do two versions of your photo - the first one which sticks to my principles to get the best astrophotograph possible from your image, and the second one you can try and make something bizarre and avante garde, or even totally insane. BUT! That photo you should expect will be just for you. Be very cautious about turning in such a photo for credit. It's too easy for a student to make a really lazy and crummy picture and then claim that my dislike of the image is making an artistic judgement againt the student. Remember, I'm trying to teach you how to make the best scientific astrophotographs.
By all means, feel free to get my or Becky's attention and ask for help in accomplishing something. But do not ask me "does that look OK?" Would Picasso ask me if his painting was "OK"?? Instead, say something like "I think the sky is too bright and grainy. How do I fix that?". That shows me you have some idea of what the ideal image should look like and just want help in what commands can accomplish it. I'll grade you on your dedication to making an image that fulfills the goal of making the best astrophotograph and records the steps you used to get there. So, I don't want a bizarre and disturbing Jackson Pollack kind of thing. You should have in mind the following guiding thought - "how can I make this image look like it was taken with a BETTER telescope, under DARKER skies, with a BETTER camera, with LESS noise, and with BETTER artistic composition in placing the borders?" If you want to create something wild and unrealistic, that's OK, but save that one for your own gallery at home, not for submitting for a grade. I want a good image that's faithful to the true object you photographed.
You can deviate into a parallel universe of artistry by clicking on the top toolbar Filter | Artistic and there's a whole toolbox of different things to try. Myself, I love watercolor paintings and sometimes try this even on astrophotos. You can also add "star of bethlehem" spikes too, under the Actions menu. Really cheesy, but there you go. Just explore. But the results are (probably) strictly for your own wall at home.
Task #1: Sizing and Printing your Image for Framing Your Image (in the CoVid Era with on-line only, there is no Print/Frame assignment due)
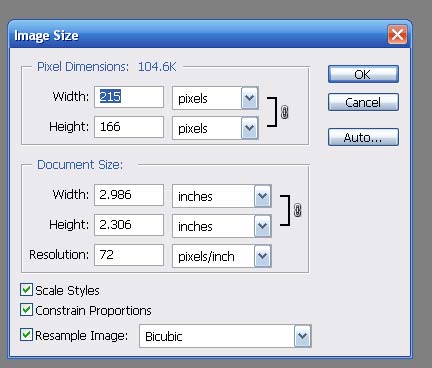
Now, before you can have your picture printed, you have to make sure your image is the right size and resolution. In Photoshop, click Image | size and it'll bring up this box. In the resolution entry type in 300 pixels per inch. Look at your photo and see if it is taller than it is wide, or wider than it is tall, and make the size as close to 10x8 inches or 8x10 inches as possible. If you can, consider cropping it to make this happen. If that will mess up your aesthetics, then don't, but then when you frame it you'll have to have a mount board frame inside your main frame. The photo should be saved as a .jpg format, and for printing, it should be saved with reasonably high quality when it asks for .jpg quality. It actually shouldn't make too much difference, so no need for 100% (or "10") quality. You won't notice any difference. Most photo places these days insist on a .jpg format, not the bigger .tiff or other uncompressed formats. Now click save as and save it as a .jpg and name it with my naming convention. For example, Jessica-M82-print.jpg. That way, you and I both can see that this is your print image. You do NOT send me your print .jpg! It's too big for our gallery and you only need it for printing to get your framed version. While you're still in Photoshop, this is the time to make your gallery versions too...
Task #2: Sizing and Emailing Me Your Gallery Images
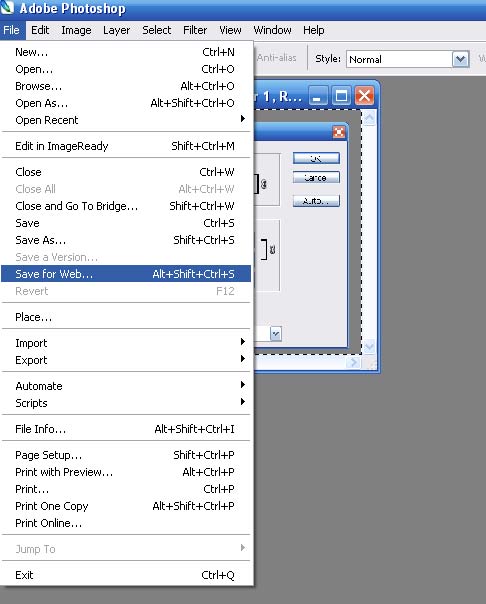
In Photoshop, click again on Image | Size and in the resolution box type in 72 pixels per inch. Then type in 1024 for the width in pixels in the same box. Then close that box and you're ready to save the full-size gallery version; click File | Save for Web and name it e.g. Jessica-M82-gallery.jpg . Then you need to also send me a "thumbnail" size version of your image, which is what you see when you look at our gallery pages. Go again to Image | Size If the image is wider than it is tall, enter 3 inches for the width. If the image is taller than it is wide, enter 3 inches for the height. I want the longest dimension to be 3", because that's our convention. Now you're ready to save it. Click Save for Web and name your thumbnail image e.g. Jessica-M82-gallery-t.jpg. These two gallery images you email to me. They should be small, much less than 1 megabyte. If they're bigger, you didn't jpg compression them enough. Use a compression of around 50 or so, don't send at highest quality because it's absolutely impossible to tell quality difference unless you get down to jpg compressions of 10 or 20 or less. 50 or so is fine, and makes for a nice small image that any email program can attach without complaining. Do NOT send me a massive TIFF image. I can't use it.
Task #3: Labels:
Next - now type up your label for all the steps you did, using your notes you took while working on your photo. Type it into a normal email to me if you like, or into Microsoft Notepad, but do NOT use a formatted program like Word or Wordpad or any other formatting software. Now that you've typed up your label, before you hit the send button send it, go ahead and copy it onto the clipboard and paste it into Word or some formatting program you like and use THAT version to actually print it so you can then tape it to the back of your framed photo. The UNformatted simple text version you email to me. While you're in Word, you should also type and print your front label that gets placed under the glass in the lower right corner of your frame.
Task #4: Submitting Your Image to a Print Place (skip this if in the CoVid era and on-line only)
The
easiest way to submit your photo for printing is to do it over the web, right
from the back of the room computers if you like. In our limited experience,
we've sometimes gotten good results from Bay Photo, and they have an outlet
just down the street from Cabrillo (Bay St. and Soquel, across from AJ's gas
station). If you go to Bay Photo be sure to talk to the person who will print your photo and make sure they understand it is an astronomical photo and will require careful manual adjusting - don't let them just assembly-line a standard mom/pop/and the dog kind of photo! And make EXTRA SURE they understand you do NOT want a perfectly black sky. You want your sky to look just like it does on the computer monitor: dark dark gray, NOT pitch black. You'll may have to pick up your photo the next day. Another recommendation is to go to Shutterfly
online in order to get your print, is my recommendation. BUT - it takes at least a week to get the photo back in the mail, so plan for that. We've
had disappointing results often from local places. Tell them you won't pay until you see the print and approve it. They don't seem to understand that these
are astrophotos and should not have perfectly black sky. When the sky is black, you can be sure the faint outer parts of your subject are lost, and the whole thing will look underexposed.
Then get a frame for an 8x10 picture at CVS or RiteAid or Walgreens or some such place. Doesn't have to be fancy, but don't scotch tape your masterpiece to a flap from a cardboard box either! If you are in Astro 8, you print, frame, and label your photo, and also email to me as a .jpg, with labels. If you are in Astro 9, you print, frame, and label your best 2 photos, and you email to me all of your images and the two labels (front and back) for each photo. If you want to keep your photo, you need to buy your own frame. If you don't want to keep your photo, and don't want to pay for a frame (they're less than $10 at most drugstores) ask me ahead of time if you can bring in your 8x10's on final exam day and put them into one of my frames, attach your labels, and so we can still photograph the whole class together, holding their photos. I usually have a few frames in the back of my office.