Instructions for your Astrophotography Images
Grading the Processed Image. In assigning points for your graded image, these are the considerations that go through my head as I look at your picture. First, your goal is to make it look as if it were taken with a bigger telescope, in a darker observing site, with less turbulent atmosphere, for a longer exposure... in other words, make it look real, but better. I don't want some artsy garish Andy Warhol version of a legitimate image. You can do that sort of thing at home alone on your own. The digital versions are yours to keep and do with what you want after the course is done.
Other grading considerations: did you apply the flat field while in CCDOPS? (dark corners are the give-away that you did not). Did you minimize thermal noise? digital noise? Did you frame/crop your subject(s) properly, or did you simply take whatever the original image had without trying to balance the objects of interest within the frame? Did you crop out noisey borders left by the stacking process? Did you adjust to get a very dark gray but not pitch black sky, especially for the .jpg gallery image (the print is not completely under your control, alas)? Did you bring up your main subject's brightness while keeping the sky dark? Did you emphasize the colors without changing the hue? Did you clone stamp out the hot pixels carefully? Did you avoid overdoing any processing step so that it looks "fake"?
1. Instructions for the Gallery Image and Labels
This is very important! Please read every word on this page, or you will be graded off out of sheer frustration because of all the extra work that you put me through in unformatting your formatted labels!
Labels! First Step - use Windows NotePad (or some other pure text editor, not MS Word)
You first make your labels with NO FORMATTING other than what I describe, in Windows Notepad (not Windows Wordpad, which inserts formatting!). Notepad is part of all Windows installations. Click on Start, Programs, Accessories and you'll see it. You might want to put an icon on your desktop to make it easier next time. Repeat, do NOT use Microsoft WORD, or Windows WordPad. They insert formatting which conflicts with our Gallery page. Use a plain text editor.
Your gallery image label should start with your Name, the name of your astronomical object, any catalog number, the telescope you used, the date of the exposure(s). Then how many exposures were stacked and how long each exposure was. Then the sky conditions (was there a moon in the sky? was it hazy, crystal clear? object high in the sky, or was it low down and if so, in what direction - over the lights of Santa Cruz, or over the dark northeastern horizon? etc. Then each step you used in CCDPOPS, in Registax, and especially in Photoshop or whatever image processing program you used. I don't need every numerical value within each processing routine (although that's nice to see). You add periods and commas to separate these items. They all run together into one long paragraph without any indentations, any double spacing, anything at all that you are tempted to add to make it "look pretty"!!!!!! Why do I say this over and over and over and it rarely gets done?! I say this because online monitor space is a premium. We do NOT have the space to put in formatted labels for every photo for every student on a single gallery page. So we have no formatting, which makes all the information there in its most compact form, as you can see.
Instead what students too often do, and which I am now going to get strict about grading off for, is they produce their label for printing and attaching to their framed photo, and then don't bother to remove formatting before emailing it to me. To be explicit, here is the WRONG way, and the RIGHT way, to send me your labels and images....
Wrong: Here is an example of an all-too-typical label sent to me for the online gallery, it really frustrates me!! I have to go in and hand-remove all the indentations, spacings, etc. This I must do when time-crunched for grading and submitting those grades to the College, as students usually turn projects in at the last minute. (As a printed back label on a framed photo, on the other hand, this is fine).
|
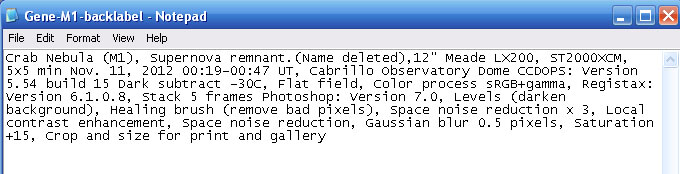
RIGHT: After I removed all the indentations, added periods and commas in proper places, and made sure there were no "carriage returns" (you get a "carriage return" when you hit the "enter" key while you're in NotePad) anywhere, then it is properly formatted for sending to me by email.
|
Good!
Sizing Your Image For The Gallery
Full size version: I want your full size gallery image to fit completely within a 1024x768 monitor screen, just to be maximum compatible with anyone on the web who might look at your images - not too big, not too small. So, in Photoshop, after you're happy with your final image, you go to image | image size and make sure that the resolution is set at 72 in units of pixels per inch. Then look at the width and height values. Set the width to 1024 and look at the height. If the height if greater than 768, then set it down to 768. This will make the width less than 1024 but that's OK. We want to make sure neither the width or the height is too large to fit on a conventional monitor screen. Either width or height will perhaps be less than the limits. Now that the size is proper, click file | save for web and append the word "gallery" to the file name, and save it. Another important requirement - there are to be NO SPACES inside the filename!! I know windows permits spaces in filenames, but they're a real pain to work with in some command languages. DON'T put spaces inside filenames. 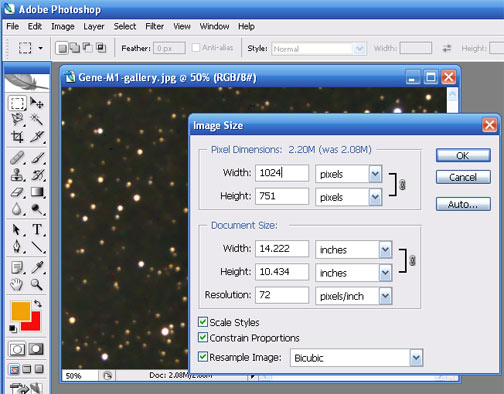
Thumbnail version: Now to make the thumbnail version. Go back into Image | Image Size and look at the document size boxes, which should be in units of inches. Make sure that the longest direction is set to 3. In other words, your thumbnail will be either 3 inches wide and less than 3 inches in height, or it'll be 3 inches in height and less than 3 inches in width. Neither dimension can be larger than 3 inches, and one should be exactly 3 inches. Then file | save for web and append a "-t" to the image name. So for example your image GeneM1.jpg becomes GeneM1gallery.jpg for the fullsize version and becomes GeneM1-t.jpg for the thumbnail.
The Deliverables for the Gallery
You're going to email to me 3 files for each image:
(1) the full size image.
(2) the thumbnail image.
(3) the unformatted image caption as a attachement text file (.txt), or as simply the content of an email so that it is completely unformatted
Mail both the fullsize and thumbnail to me, along with the unformatted text. Do that for all images
2. Instructions for the Framed Print Version
On the date of the final exam, you need to bring in your 8x10 print of the photo(s), framed in an 8x10 (or larger) frame, and it must have a small front label, and also another label on the backside. The front and back labels must be output to a printer (not hand-scribbled!).
Now that you have sent me what I want for making our gallery, you can format your wording to look pretty on the backside of your framed photograph. Please do use reasonable choices, like in the example below, to make your printed version look nice. We simply don't have the space on a gallery page to insert all this spacing when there are ~20 students and 5-6 pictures per person (for Astro 9)! It's good to help me by guiding my eye with formatting, but I'm mostly concerned with how detailed and complete are your descriptions of your steps. Remember, it was ME who did most of the work at the telescope, so YOU must show me what your learning and contribution is by your labels. That's why they give such a big fraction of the grade points.
Front label
This should contain your object's common name (e.g. "The Crab Nebula") if it has one, the catalog and number (e.g. "NGC 2324"), your name, the semester and year, and the number and length of the exposures on what telescope (e.g. "3x5min exposures on 12" Dome scope")
Back Label
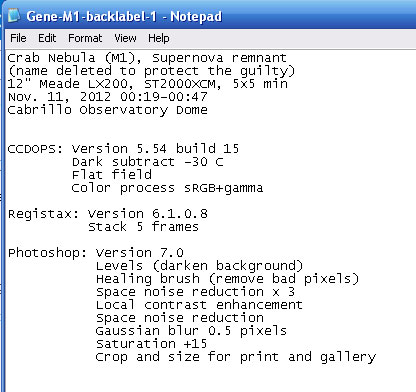
This should contain everything - your name, object's name, telescope, the notes you took while taking the exposure,
and all the software processing steps, especially all your Photoshop  commands and adjustments. Unlike the gallery label, this label should be formatted - it should be divided up between the different phases I described above. Here's an example of a formatted printed label that's pretty good.
