POD Construction - The Short/Sweet Digestion of the Videos
* Primary Dome: the one with the shorter flange at the bottom, and the triplet bolt holes for brackets, and the "L" gasket
* No power tools on any component in this POD except for bay tray bolt holes. Hand tighten all components
* Bring English socket set and ratchet, for bay sliders, and for attaching dome to flooring
Buy before starting: 13 ft of 1" wide weather stripping, staple gun. Silicone and gun.
Buy sometime later: rubber matting for floor. Plastic bag to cover telescope after each use. Extension cord to run into bay. Thick weatherstripping for around pier
1. Dome Assembly
 First, apply weather stripping to the joint between the dome quarters. Use the narrower 1/2" weather stripping, make sure it's applied only to the interface surface which is parallel to the dome surface, not the perpendicular (vertical) surface. It's
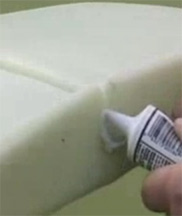 to be sqeezed by the bolts holding the dome quarters together.
Tip the primary dome pieces so the flange edge is up, at working height. Use a handiClamp to bring the two pieces to level, orienting the clamp so that it's horizontal as you work on it (which corresponds to the vertical direction when the dome is at final placement on the POD wall). Bolt together the two quarters, starting with the flange edge. Don't snug down tight yet. Then move to the adjacent next screw. Now flip the dome 90 degrees so the other edge is on the ground. Skip bolt #3 and go to #4 bolt. Use a screwdrive into bolt #3's hole to tweek the dome alignment up or down to get #4 right. Then bolt #3. Bolts at this point are all just "snug", not "tight". Now after you see it's all good, go back and make them tight, starting with #4 and going back to the flange short bolt.
Now apply silicone sealant along the joint as shown at right.You need to do it before you mount it on the dome because that flange bottom is not accessible once installed.
Dome plates
 4 wide heavy plates go on the primary dome flange. Inner curved edge of dome plates should be 7/8" above the inner curved edge of the dome flange. The 1st plate starts on the edge which is resting on the ground. Make sure the metal doesn't go below the plastic, as the plastic edge probably isn't totally resting on the ground at this moment. Screw in the first screw, nearest to the ground. Don't use washers on the metal plates. Now have an assistant take the weight off the dome joint at the apex, to insure the dome shape isn't warped by gravity. Screw in the far screw on this 1st plate, and then do the others on this plate. Hand snug the screws. Again, have an assistant take the weight off the dome interface joint because you want to insure your plates (which maintain the shape of the dome) are truely on a semi-circle, so have the assistant gently lift from the joint area and make sure the flange points on the ground are not spread apart by gravity. Now you're ready to screw in the second plate. Second plate starts right where the first one left off and you'll notice that it then overlaps the dome interface joint by about 1/2", which insures smooth travel of the wheels.
Dome "L" Flange
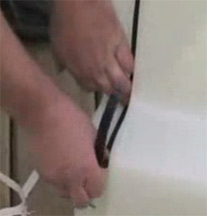
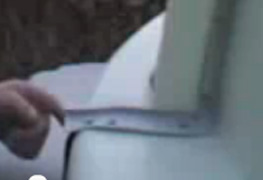
 Start the flange rubber as shown on the picture. The steel starts where the flange transitions to dome surface. Need assistant to gently hold rubber from above. Use panhead screws and washers and screw in bottom hole and work your way up one hole at a time. Do not skip holes! One at a time in sequence. Do not predrill screw holes, fit won't be as good if you do. Don't overtighten screws or it'll buckle the rubber. When you get to the peak, at the joint, you should apply some sealant behind the rubber where the gap is. You'll note when you've done 180 degrees, there's excess rubber gasket, just leave it for now, or trim off a bit but leave some excess for later.
Putting Together the Walls
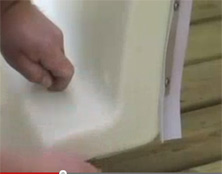
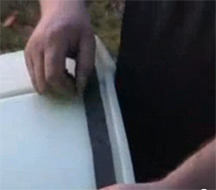
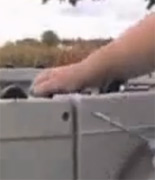 Assemble wall pieces using the male end going to the female end on adjacent wall (at bottom of wall pieces). If the tops aren't quite flush, use this trick - get a strong phillips screwdriver and insert into hole and pry up or down to level the tops, as shown in photo. When all pieces are assembled, you circularize the dome by using a tape measure and measure at 3 widely different points that the diameter is the same. If not, kick the wall joint at the floor on the longer diameter, from the outside, till it measures good. Install wheels by inserting fiberglass axels with wheel (and in these videos, they did not have the plastic bushings. These videos are circa '07) and bushing. Very tight, so put axel of wheel on the non-bushing side on top of hole and use piece of wood to press down till it snaps in.
Installing the Dome onto the Walls
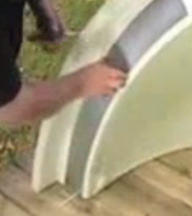
 With assistant, lift primary dome (which has the "L" gasket you installed)
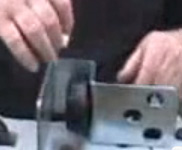
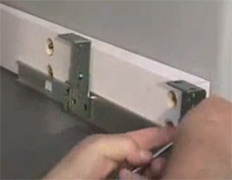
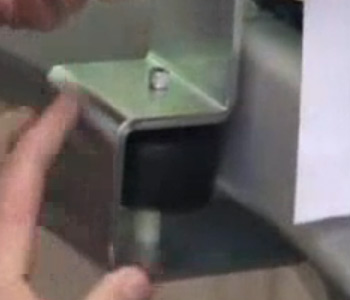
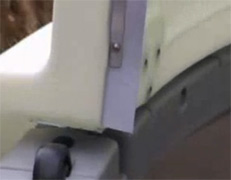 onto the wall wheels. The wall top and the dome bottom should line up nicely if you've circularized your walls and been careful about dome assembly, as in photo at right. Now to assemble the dome brackets. A wheel rides inside the dome bracket. So get a bracket, the 1/4 bolt, a wheel, and a bushing, push the bolt through the hole, through the wheel and bushing and through the bottom of the bracket. Photo at left show him holding the bushing and about to put it behind the black wheel before pushing the bolt all the way through. Screw on the acorn locknet. Don't overtighten and bend the bracket opening. Do that for all three dome brackets. Now bolt the brackets onto the bottom of the dome at the 3-hole positions. Adjust vertically so the wheel overlaps the bottom of the riding surface, not centered on it.
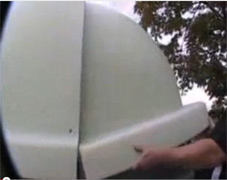
Installing the secondary dome: The lip on the secondary dome should prevent any water from getting through between domes, but to further insure, you can buy some 1" foam rubber weather stripping and apply to secondary dome before you install it. Leave a 1/4" gap at the top, tapering down to no gap as you get closer to the bottom flanges of the secondary dome. Only need to go down maybe 45 degrees from the top. The foam should, when dome halves installed, push slightly up against the "L" gasket and keep water out. See 4th picture below. Make this decision before installing secondary dome.
Now, to install secondary dome - bring the dome in on an angle, tucking it in under the primary dome and rest it on the wall wheels, as shown in first photo below. Get your long pivot bolt and push it through both domes at the pivot point (see dot on primary dome at left). Put on washer and acorn nut on the interior side of the bolt. Do for both sides of dome. Now cut off 12" of the wide foam rubber weather stripping from your roll and apply it to the primary dome so that when the secondary dome shuts, it compresses the foam. Make sure the foam slopes downward so water drains off. See picture at right. Can use a staple gun to help keep the foam rubber on after applying it. Mark on the secondary dome where the primary dome's foam ends, cut a 17" piece of foam weather strip, and apply it to the secondary dome so it'll mate with that of the primary dome's (lower foam in picture), as shown at right, and continue on to the inside of the dome (upper foam in picture). Now to finish the "L" gasket - use a piece to lay in onto the secondary dome as shown in 3rd picture below, using 3 screws/washers, after tucking in the right hand edge underneath the existing "L"gasket.
Tuck secondary dome under primary |

Weatherstrip dome contacts |
"L" gasket piece, screw onto sec dome. |
Weatherstrip on sec dome before installation
|
Attach Dome to Flooring
Video uses 1/2" diameter lag screws. Rotate dome after installing each lag screw to insure it is staying round. Go around in sequence, don't skip and fill in later. This better insures roundness.
Locking knob bolts. There are two, with big black round handles. These screw through the secondary dome into the wall to lock it down.
After dome is completely assembled and working, then caulk with silicone around the floor and between dome segments.
Installing Shelf in POD Bay
 Measure 26" above bay floor and 25" from the back inside surface and mark that spot with sharpie. That's your firs
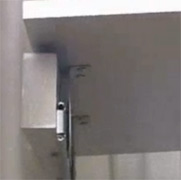 t screw hole (top left screw on the photo). Do the same marking on the opposite side of bay. This is where the railing wood wedge will go. The fat end of the wood is forward. From hardware package for bay, find longest 1/4" screw and washer and rubber backer and 'transfer to wedge' and install screw. Use a level to then allow using a drill to drill through the bay wall for all other holes. Apply screws with allen head on the outside and nut inside the wood. Use a socket or needle nose pliers to keep nut fixed while applying allen head torque from the outside of the bay. Hand tighten. Now install shelf sliders, so front is flush with the front of the wedge. The slider attaches to the wood with two screw holes on the underside of the wood. 1/2" supplied screws are fine for using a laptop computer on the shelf. But, you have the option of using longer screws for more weight bearing ability. Install metal little "L" brackets on to the sliders, which will support your shelf. Two per slider. Make sure the top flat part is above the top of the wood wedge so your shelf slides freely. Get on your back and screw in the screws to attach the shelf to the little "L" brackets
Final Weather-izing
Apply a flexible silicone sealant like "mono ultra" to the bolted interface between dome quarters for added protection.