Astrophotography Project - Choosing Your Photo Subject(s)
Your Name__________________________________________If you're using our desktop computers at the back of the room, Rick will power them up and log in. If you don't have C2A yet installed on your PC (or Stellarium installed on your Mac), then that's the first thing to do. Download version 2.1.7 from here. Choose the "full distribution" unless you've already got it installed and just need an update.
(31 pts total). Your astrophotography project is the single biggest lab you will do. Judging from past semesters, it's also the most exciting and enjoyable! You'll use either the 8" f/4 LXD75 outdoors, or the 12" LX200 in the dome. Your first task, therefore, is to choose your target. That's the goal of this lab. It'll either be a Deep Sky Object (DSO) or a new comet. This page is on-line and many of the bold-faced items are hyper-linked. I recommend you click on this page here, as well as keep the hardcopy in front of you so you can fill out the entries for your objects.
The target must meet certain criteria in order to be acceptable targets for this project...
1. Size: It must be at least 5' across when using the 12" scope in the dome.
2. Type: It must be a "deep sky object" ( nebula, planetary nebula, galaxy, or maybe star cluster), or a comet
3. Brightness: It must must be bright enough. Star clusters, comets, planetary nebulae or galaxies must be magnitude 10.6 or brighter. If it's a nebula, magnitude is not well defined, so ask Dr. Rick! Be aware that an object that is big but faint will have a low contrast with our light polluted night sky and so not be acceptable. Nebulae can be tough this way.
4. High in the sky: Most important, it must be at least 27 degrees above the horizon during at least one of the class times below.
5. It should be photogenic! This may be your only chance to use a big scope to get such an image. Impress your friends - you're an ASTROPHOTOGRAPHER!
Note: Spring Semester: Early date/time=Feb 20 8:00pm and Late date/time=9:30pm May 1. For Fall Semester: early date/time=8:00pm Sept 20 and late date/time=9:30pm Nov 28
1. (3pts) Use C2A and set it to the early date/time write here the constellation which is highest overhead on your chart _____________________ (the middle of the chart)
2. (3pts) Do the same again, only now for the late date/time. Write down the constellation that's now overhead ___________________________ (the middle of the chart round horizon)
Additional Considerations:
* Look for color. Open star clusters are dime-a-dozen and fairly colorless and boring! Globular clusters are a bit better, but Nebulae and Planetary Nebulae are the most colorful. Don't do E (elliptical galaxies) or S0 galaxies; they're boring fuzzballs. Spiral and Irregular galaxies are the prettiest galaxies. Comets, if they're in the sky, are also great subjects.
*There's an exception - if you can photograph at least two galaxies in a cluster or group, then you can be less picky about whether each galaxy is photogenic and large. The size limit can be overruled if you can get two different targets in the same frame. Galaxy groups for example, can and should be considered, although at least one of the bigger galaxies should be a pretty spiral or irregular, rather than boring ellipticals and S0's.
2. (25 pts possible) Now go back to one of the computers in the back of room 705 or to your own laptop computer, and start looking for beautiful subjects. Use google! Search term suggestions: "Best Spring (Fall) deep sky objects", best deep sky objects, best nebulae, favorite deep sky objects... you get the idea. This will likely turn up beautiful possibilities. To turn up hidden gems, use C2A (see below) and get your date and time set right, then just start clicking on the red ovals (galaxies), green cross circles (PN's), and green borders (nebulae) etc and see if they are big and bright enough. Look for galaxy groups. PN's will mostly be too small, but some may work. Hint; 27 degrees above the horizon corresponds to about a thumb width above your star wheel horizon. When you're looking at pictures online for your targets, be careful to look for amateur pictures, not Hubble Space Telescope or big observatory pictures - those will give you an unrealistic impression. Write down 5 candidate photo subjects at the end of this lab sheet. Note that objects will always have a catalog number, and might (if it's a classic!) have a common name as well. Write them both down here (if it doesn't have a common name, don't worry). Example: catalog name M42 = The Orion Nebula. Common catalogs: Messier catalog (M), New General Catalog (NGC), IC catalog, CED catalog. For "type", tell me whether it is an diffuse (eNeb) or dust/reflection nebula (dNeb), planetary nebula (PN), galaxy (Gal), open star cluster (OC) or globular star cluster (GC). No more than ONE of your 5 subjects can be an open cluster. Why? Because they're BORING!
Use software to find the exact altitude of the target at both of the date/times I specified ![]() above. You'll do this with a application called C2A, which is amazingly great way to learn the sky and all that's in it - and it's totally free!! C2A is already loaded on all the computers in room 705, and in the observatory. I'd recommend you download it on your own laptop or home desktop computer (Windows only) so you can finish this project at home. It's important that you get this project done right away because we need to begin taking photo's as soon as we get clear nights at the observatory. If you have a Mac, I recommend Stellarium
above. You'll do this with a application called C2A, which is amazingly great way to learn the sky and all that's in it - and it's totally free!! C2A is already loaded on all the computers in room 705, and in the observatory. I'd recommend you download it on your own laptop or home desktop computer (Windows only) so you can finish this project at home. It's important that you get this project done right away because we need to begin taking photo's as soon as we get clear nights at the observatory. If you have a Mac, I recommend Stellarium
Leave the last column (score) blank; I'll use that for grading.Your grading will be based on how good a subject it is and how well it meets the criteria. Remember; deduction of 1 pt for projects already photo'd in past classes.
Installing C2A (on your Own Windows Computer)
To install on your own computer, go to the C2A home page and part way down you'll click on "version .... full distribution" and follow the instructions. After it is installed, you need to set a few parameters. Fire up the program and note the toolbar along the top. It looks like this...
 |
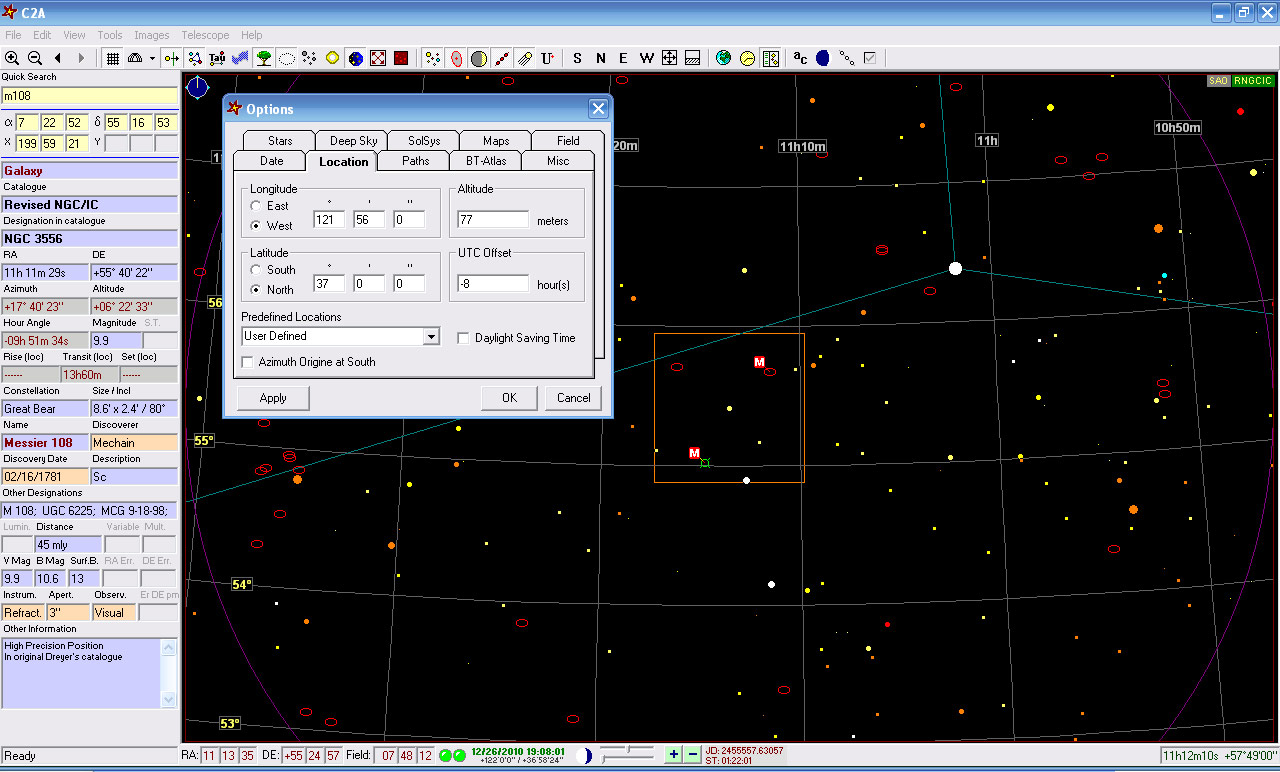
Click on the yellow clock on the right side. It'll bring up a box with a number of tabs in which you can put your parameters. Click the location tab and enter the numbers found in the option box on this screen capture, and then click OK.
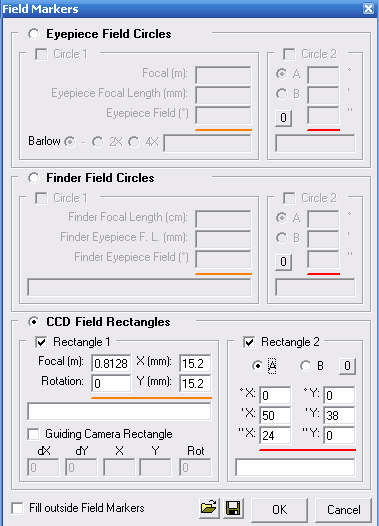
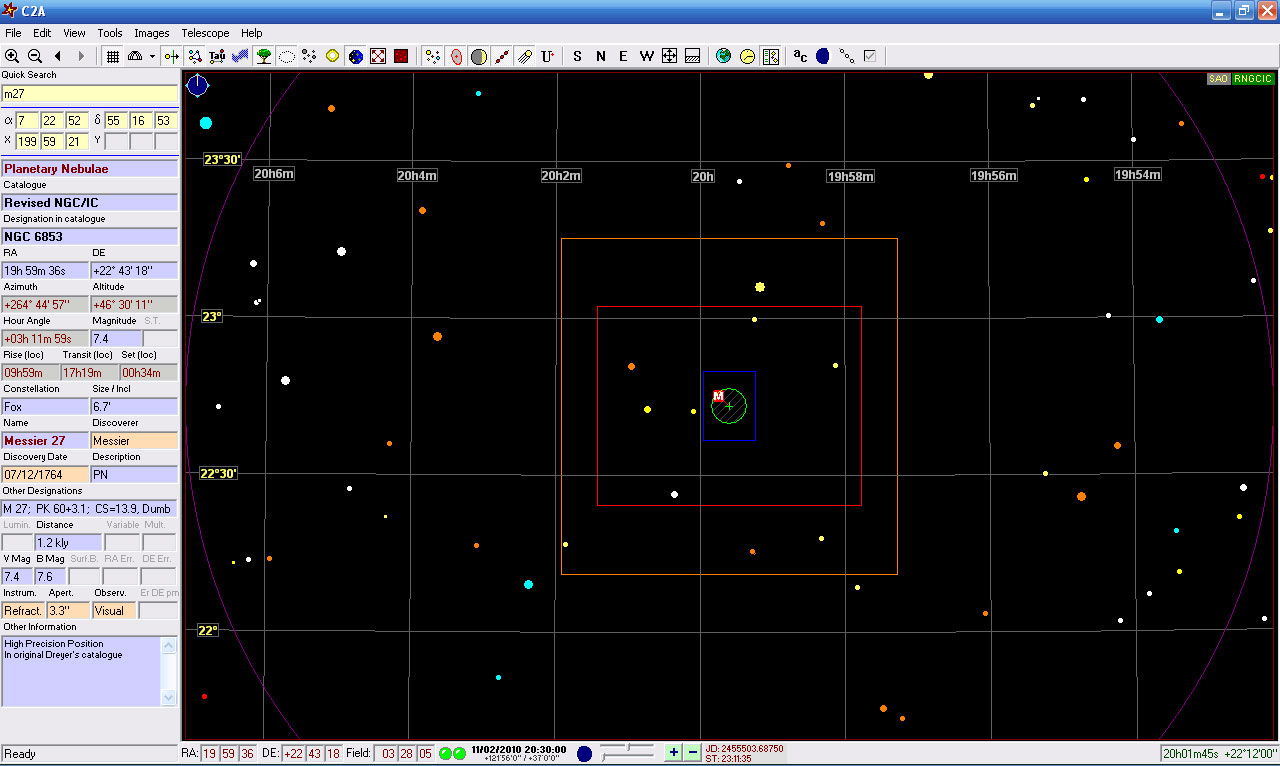
Next, you'll want to set the camera's field of view so you can see how big your picture will extend on the sky. It'll 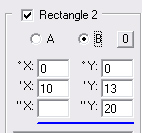 be important for composing your picture, especially if there are other nearby DSO's you can include for a better shot. Click on "tools" and then "field markers" on the drop down box. It'll bring up the "field markers" box you see at right. Enter each number and check mark exactly as shown at right. Then, under "Rectangle 2" click on "B" and then enter the numbers as shown at left, then click "OK". You should now see 3 rectangles projected on the stars, like this. The biggest one is the view for the ST4K camera on the 8" LXD75, the middle one is for the ST2K camera on the 8" LXD75, and the smallest one is for the ST2K camera on the 12" scope in the dome.
Using C2A.
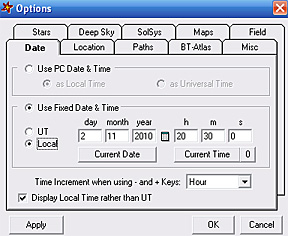 If you're in Room 705 at a computer in the back, fire it up and have Rick log in. Now click on the blue C2A icon. Now you'll want to enter the first of the two date/time combo's for our semester. Click on the yellow clock again, and then on the date tab to bring up this box at left. Click to select the use fixed date and time, local, and display local time rather than UT options as shown. Then enter either the Early Semester Date/Time or the Late Semester Date/Time. Be sure to use 24hr time, not a.m. or p.m., so 8pm is 20hr, for example. Then click OK. C2A will now be set for the proper date and time and for Cabrillo Observatory, showing the sky at that time.
To find your chosen target, enter its catalog name in the quick search box near the upper left of the screen, and click your computer's Enter key. It must be a Messier Catalog number (like M42) or an NCG catalog number (like NGC 2344) or an IC catalog number (like IC 280). C2A doesn't have other catalogs. You'll probably see a warning pop up box appear, but don't worry, just hit the OK in the box and it'll go to your target. Zoom in (the little magnifying glass with a + sign at left on the toolbar) to see it better. In a wide column on the left side of your screen, left of the star chart, you'll see a bunch of useful information in boxes. Look for altitude - that is how high your object is above the horizon. It must be 27 or higher at either early or late date/time to qualify. Look also for magnitude (nebulae may not have this) and for size and make sure your target fits our criteria. Enter that data in the table below, in pencil - if you get a bad parameter, you'll have to erase. Do this for all 5 of your objects, then repeat, using the late date/time. The altitude will change, probably by a lot.
If you're just browsing across the sky looking for possible targets, you right-click on the object you're curious about and in the pop-up box click info, and the information on it will be displayed at the left side of the screen. For diffuse nebulae, magnitude will probably not be given. Ask Rick if it's do-able. "Fav" column is for you, to rank your first choice, second, etc.
Your Fav |
Common Name, if it has one | Catalog and Number (like M31) | Type (e,dNeb, PN, Gal, OC, GC | Constellation Name | Size ( ' ) | Mag | Altitude (degrees only) for Early date/time |
Altitude for Late Date,time |
Rick's Grading Score (out of 5) |
When it's your turn on the Big Scope, this is the list and ranking that I (we) will use. Remember your choices! It makes a better impression when I ask "who's got a photo project to do?